Clients may not know how to send you a copy of emails in their Microsoft Outlook folders. The following instructions will help them with this process.
| 1. | Open Microsoft Outlook. |
| 2. | On the File menu, click Options, and then click on the Advanced menu. |
| 3. | Click the Export button. |
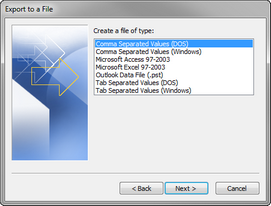
| 4. | In the Import and Export Wizard, click Export to a file, then click Next. |
| 5. | In the Export to a File dialog box, click Outlook Data File (.pst), then click Next. |

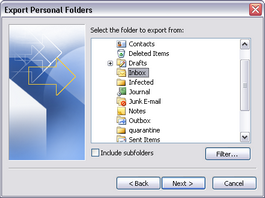
| 6. | In the Export Outlook Data File dialog box, select the folder that contains the emails you want to export, then click Next. |

Select the Include subfolders check box, if needed.
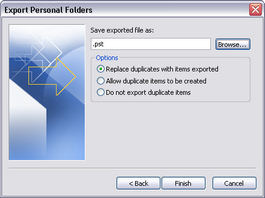
| 7. | In the Export Personal Folders box, click the Browse button to navigate to the location where you want the email folder saved. |
| 8. | In the Open Personal Folders box, type in a file name for the .pst file, then click OK. |
| 9. | In the Save exported file as dialog box, select the applicable option for duplicate handling, then click Finish. |

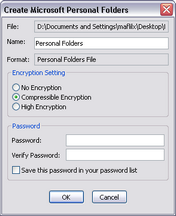
| 10. | In the Create Microsoft Personal Folders box, select an encryption setting and password (if needed), then click OK. |

It is not necessary for clients to set a password.
The .pst file is now saved to the location specified.
| 11. | Close the Microsoft Outlook application. |
This step is very important, otherwise the .pst file will not save properly. It may also take several minutes to save close Outlook.
| 12. | Navigate to the folder location where the .pst file is stored. |

| 13. | Right-click on the file and select a Zip option, like WinZip. |
| 14. | Restart Microsoft Outlook. |
| 15. | Have the client attach the zipped .pst file in an email and send it to you. |

|
The exported .pst file may also be burned to a CD or copied to a portable memory storage device like a USB memory stick. If you receive the .pst file on a CD, you must save it on your hard drive before importing the files into Outlook. You can import the file directly from the memory stick.
|
|


