| 1. | On the Reports menu, click ReportBooks and then click Manage ReportBooks. |
| 2. | In the Manage ReportBooks dialog box, click the New button to open the ReportBook utility. |
| 3. | When the ReportBook wizard launches, click Next. |
| 4. | In the Add Report(s) dialog box, click the Add Report button. |
| 5. | In the New ReportBook Report dialog box, select the case data type for this report, then click Next. |

| 6. | In the New ReportBook Report dialog box, select the template you want to use and expand the listing by clicking the right-arrow  . . |

| 7. | Click the  to expand the template listing and make additional specifications, such as filtering aspects of this report, selecting specific fields, adjusting the sort order, and more, then click Next. to expand the template listing and make additional specifications, such as filtering aspects of this report, selecting specific fields, adjusting the sort order, and more, then click Next. |
| 8. | In the New ReportBook Report dialog box, expand the selections as appropriate, select a template, and click Next to continue.. |
| 9. | Type in a name for the report. |

| 10. | Select Open "Customize Report" after the report is created to preview the report later. |
| 11. | Click Finish to continue. |
| 12. | In the Edit Report dialog box, click the Fields button to add/remove fields. |
| 13. | In the Customize Report Fields dialog box, add or remove fields from in the Visible Fields box and organize the field order by clicking the Move Up and Move Down buttons , as needed. |

| 14. | Click Close to continue. |
In the Edit Report dialog box, click on the Sort Order button to sort the spreadsheet data in a specific order, then click OK.

For more information, see Sorting multiple fields.
|
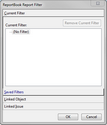
In the Edit Report dialog box, click the Filter button to add/remove a spreadsheet filter, then click OK.

| • | Click the Current Filter bar to display active filters for the selected spreadsheet. Select the filter and click the Remove Current Filter button to delete the active filter. |
| • | Click the Saved Searches bar to use a filter that is already created. |
| • | Click the Linked Object bar to only include records that are linked to selected objects, and additionally that are in selected fields. |
| • | Click the Linked Issue bar to select an issue to use an a filter for the report. Select the Include sub-issues check box, if you want this option. |
|
In the Edit Report dialog box, click the Group button to select whether to group spreadsheet records by issue or object, then click OK.

| • | If you select Group by Object links, click on an object spreadsheet to group the records by object type. |
| • | In the Options area, select check boxes to indicate whether you are skipping empty detail fields and records with no links. In the Max Lines Per Field, type or click on the number of maximum lines to include in the report. |
| • | In the Contents area, click the Fields button to add any hidden fields to the report. If you are grouping records by issue links, click the Filter button to select which issues to use as a filter. If you are grouping records by object, the Filter button is unavailable. |
|
In the Edit Report dialog box, click the Options button to select report print options, then click OK.

| • | In the Scaling area, select whether you want normal scaling, to shrink field widths, or to shrink the font size. |
| • | In the Orientation area, select whether you want portrait or landscape. |
| • | In the Misc. area, select whether to include gridlines, page breaks by rows, and enter the number of repeat fields you want to allow. |
| • | Click the Options button to save these settings as your default print options or to load CaseMap's default settings. |
|
| 18. | In the Edit Report dialog box, click the Preview button to review the ReportBook before printing, then click Close. |
You may also print the report directly from the Print Preview window.
| 19. | Click the Print button to select the printer destination and additional print settings, then click OK. |
| 20. | Click OK to close the ReportBook utility when you are finished. |
| 21. | Click OK to return to the ReportBook utility. |
| 22. | In the Add Report(s) dialog box, continue creating additional custom reports (following the steps outlined above) to add to your custom ReportBook, then click Next. |
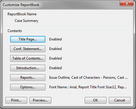
| 23. | In the Set Options dialog box, select the check boxes for the title pages you want to include in the ReportBook. |
Click the Modify button to open the Customize ReportBook dialog box.the title pages, then click OK.

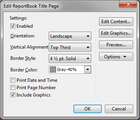
Click the Title Page box to open the Edit ReportBook Title Page dialog box.

In the Settings area:
| • | Select the Enabled check box to use CaseMap's default title page layouts. |
| • | In the Orientation listing, click whether you want Portrait or Landscape. |
| • | In the Vertical Alignment listing, click on the alignment option you want: Top, Top Third, Middle, Bottom Third, Bottom. |
| • | In the Border Style listing, click the point size for the border width. |
| • | In the Border Color listing, click the color scale you want to use. |
| • | Select check boxes to include Print Date and Time, Print Page Number, and Include Graphics. |
| • | Click the Edit Content button to modify the content that prints on each page, including typing or pasting text, modifying the font size and color, adjusting text alignment, inserting symbols or specific fields. |
| • | Click the Edit Graphics button to preview current graphics, and modify the header and footer graphic settings. You can also remove, load, and save graphics for title pages. |
| • | Click the Preview button to review changes you make before saving and printing the report. |
| • | Click the Options button to save settings as your default or to load CaseMap's default settings. |

|
Changes to graphics affect all users and all reports in the case.
|
|
| 25. | Click Next to continue. |
| 26. | In the Name ReportBook and Finish dialog box, type in a unique name for the custom ReportBook. |

| 27. | Click the Finish button to generate the ReportBook. |
The new ReportBook now displays in the Available ReportBooks box in the Manage ReportBooks dialog box.
Notice that the number of reports within the ReportBook and who it was created by are also displayed.
| 28. | In the Manage ReportBooks dialog box, click Close when you are finished. |
|


