DocManager allows you to modify many options to enhance your linked file review preference.
You can configure these DocManager options:
| • | Open linked documents in DocManager or native applications |
| • | Default annotation tool (Text annotation is the default) |
| • | Pin or unpin documents opened in DocManager (default is unpinned) |
| • | Change the annotation color to your personal viewing preference |
| • | Search hit highlight color (defaults to blue) |
| • | Printed annotation color (default is yellow) |
| • | Include or exclude annotation comments when printing to PDF (default is exclude) |
| • | Burn annotations in the printed output and/or hide annotation notes |
| 1. | In CaseMap, on the File tab, click Options, and then click Spreadsheet. |
| 2. | Do either of the following: |
| o | To have linked documents open in DocManager, select the Open Linked Files in DocManager check box. |
| o | To have linked documents open in their native applications (e.g., Acrobat, Word, etc.), clear the check box. |
|
| 1. | Open a linked file in DocManager. |
| 2. | On the Home ribbon, click Edit and then select Options. |
You can also click the Options icon in the lower right corner of the View ribbon. in the lower right corner of the View ribbon.

| 3. | On the General tab, clear or select the Pin Tabs On Open check box, depending on your preference. |
The default setting is for the document tabs to be unpinned.
You can also click the View ribbon and then select the Pin Tabs on Open check box.
| 4. | Click OK to save your changes. |
|
| 1. | Open a linked file in DocManager. |
| 2. | On the Home ribbon, click Edit and then select Options. |
You can also click the Options icon in the lower right corner of the View ribbon.
| 3. | In the Options dialog box, click the General tab. |

| 4. | In the Default Tool list, click the setting you want to use each time DocManager launches: Select Text, Select Annotations, Annotate Text, or Annotate Area. |
| 5. | In the Annotation Color list, click on the color you want to use for your annotations. |
The annotation default color is yellow. The annotation color you select here is for your user view. Other case users may opt to use a different annotation color.
| 6. | Clear or select the Pin Tabs On Open check box, depending on your preference. |
The default setting is for the document tabs to be unpinned.
You can also click the View ribbon and then click Pin Tab.
| 7. | Click OK to save your changes. |
|
| 1. | Open a linked file in DocManager. |
| 2. | On the View ribbon, click the Options icon. |
| 3. | In the Options dialog box, click the Hit Highlighting tab. |

| 4. | In the Hit Highlight Color list, click the color you want to use for search hits. |
The hit highlight default color is blue.
| 5. | In the Maximum pages for automatic hit highlighting field, type in the maximum number of pages in a document before CaseMap will no longer display highlighted search hits. |
The setting defaults to 30 pages.
Use this feature to avoid unnecessary delays when viewing large documents in DocManager.
| 6. | Click OK to save your changes. |
|
| 1. | Open a linked file in DocManager. |
| 2. | On the Home ribbon, click Edit and then select Options. |
| 3. | In the Options dialog box, click the Printing tab. |
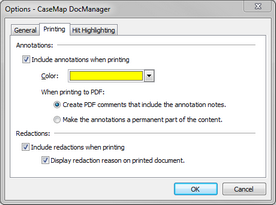
| 4. | Clear or select the Include annotations when printing check box, depending on your preference. |
The default setting is to not include annotations when printing (cleared).
| 5. | In the Color list, select the color for which you want all annotations to print. |
The default print color is yellow.
This settings does not affect the annotation color applied in the document. It is the setting color for printing annotations.
| 6. | In the When printing to PDF area, select the option you want for printing: |
| • | Create PDF comments that include the annotation notes |
This option display notes in the printed output when the mouse pointer is placed over the annotation.
| • | Make the annotations a permanent part of the content |
This option burns the annotation on the printed output, but notes do not display.
| 7. | In the Redactions area, select the option(s) you want for printing: |
| • | Include reactions when printing |
This option includes documents with redacted content when printing.
| • | Display redaction reason on printed document |
This option includes the redaction reason on the document when it's printed.
| 8. | Click OK to save your changes. |
|


