| 1. | In the Search field, type in a search and click the Full Text Search button. |
| 2. | In the Search Results pane, click the Search ReportBooks link in the Resources pane. |
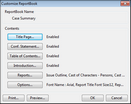
| 3. | In the Search ReportBook dialog box, modify the ReportBook contents as needed. |

To modify the title page
| 1. | In the Customize ReportBook dialog box, click on the Title Page button to modify content, graphics, and settings. |

| • | Select the Enabled check box to use CaseMap's default title page layouts. |
| • | In the Orientation listing, click whether you want Portrait or Landscape. |
| • | In the Vertical Alignment listing, click on the alignment option you want: Top, Top Third, Middle, Bottom Third, Bottom. |
| • | In the Border Style listing, click the point size for the border width. |
| • | In the Border Color listing, click the color scale you want to use. |
| • | Select check boxes to include Print Date and Time, Print Page Number, and Include Graphics. |
| 3. | Click the Edit Content button to modify the content that prints on each page, including typing or pasting text, modifying the font size and color, adjusting text alignment, inserting symbols or specific fields. |
| 4. | Click the Edit Graphics button to preview current graphics, and modify the header and footer graphic settings. You can also remove, load, and save graphics for title pages. |
| 5. | Click the Preview button to review changes you make before saving and printing the report. |
| 6. | Click the Options button to save settings as your default or to load CaseMap's default settings. |

|
Changes to graphics affect all users and all reports in the case.
|
|
To modify the confidentiality statement
| 1. | In the Customize ReportBook dialog box, click the Conf. Statement button. |
| 2. | In the Edit ReportBook Confidentiality Statement dialog box, select the Enabled check box under the Settings heading. |
| 3. | In the Edit ReportBook Confidentiality Statement dialog box, click the Edit Content button. |
| 4. | In the Edit ReportBook Confidentiality Statement Content window, modify text as well as font size and style, symbols, and fields using the toolbar buttons. |
| 5. | Click OK to save the changes. |
| 6. | In the Edit ReportBook Confidentiality Statement dialog box, modify additional preferences in the Settings area that you want applied to the confidentiality statement page. |
Settings made here only affect the confidentiality statement and not changes made to the same settings when you click the Title Page or Introduction buttons.
| 7. | Click the Preview button to review your changes. |
| 8. | Click Close to close the preview screen. |
| 9. | Click OK to save the changes. |
| 10. | In the Search ReportBook dialog box, click Close. |
|
To modify the table of contents
| 1. | In the Customize ReportBook dialog box, click the Table of Contents button. |
| 2. | In the Edit ReportBook Table of Contents dialog box, click the Edit Content button. |
| 3. | In the Edit ReportBook Table of Contents Content window, modify text as well as font size and style, symbols, and fields using the toolbar buttons. |
| 4. | Click OK to save the changes. |
| 5. | In the Edit ReportBook Table of Contents dialog box, modify additional preferences in the Settings area that you want applied to the table of contents page. |
Settings made here only affect the table of contents page and not changes made to the same settings when you click the Title Page or Conf. Statement buttons.
| 6. | Click the Preview button to review your changes. |
| 7. | Click OK to save the changes. |
|
To modify the introduction
| 1. | In the Customize ReportBook dialog box, click the Introduction button. |
| 2. | In the Edit ReportBook Confidentiality Introduction dialog box, select the Enabled check box under the Settings heading. |
| 3. | In the Edit ReportBook Introduction dialog box, click the Edit Content button. |
| 4. | In the Edit ReportBook Introduction Content window, modify text as well as font size and style, symbols, and fields using the toolbar buttons. |
| 5. | Click OK to save the changes. |
| 6. | In the Edit ReportBook Introduction dialog box, modify additional preferences in the Settings area that you want applied to the introduction page. |
Settings made here only affect the introduction page and not changes made to the same settings when you click the Title Page or Conf. Statement buttons.
| 7. | Click the Preview button to review your changes. |
| 8. | Click OK to save the changes. |
|
To modify reports
| 1. | In the Customize ReportBook dialog box, click the Reports button. |
| 2. | In the ReportBooks Reports dialog box, select or clear check boxes for the reports you want to include in the ReportBook. |


|
To modify or edit a report within a ReportBook, click the Modify button to change fields, sort order, filters, groups, and print options for the report. Click the Rename button to change the report name within the ReportBook.
|
| 3. | Click OK to save the changes. |
|
To modify options
| 1. | In the Customize ReportBook dialog box, click the Options button. |
| 2. | In the ReportBook Options dialog box, review the name in the ReportBook Name area. |

| 3. | In the Contents area, click the Fonts button to modify the font type and size for the title page and body content, then click OK. |
| 4. | Click the Paper Settings button to select the paper size and printer tray, then click OK. |
| 5. | Click the Report Settings button to review the report confidentiality statement and select or clear check boxes to include a report title, subtitle, date and time, confidentiality statement, author/scribe short names, and page numbers. |

| 6. | Click OK to save the changes. |
| 7. | Click the Report Title Pages button to modify settings for the ReportBook title page, then click OK. |
| 8. | In the ReportBook Options dialog box, click OK to continue. |
| 9. | In the Customize ReportBook dialog box, click OK to save changes to all reports within the ReportBook. |
| 10. | In the Manage ReportBooks dialog box, click Close when you are finished modifying this ReportBook. |
|
| 4. | Click Print to select your print options, then click OK. |
If you print to a network printer or HTML file, linked documents will not print.
To print with embedded linked files
| 1. | In the Search ReportBook dialog box, click the Print button. |
| 2. | In the Print dialog box, click PDF in the Destination box. |
| 3. | In the Adobe PDF box, click Save As PDF. |
| 5. | In the Save As PDF dialog box, navigate to the folder where you want to save the report, then click Save. |
| 6. | In the message box, click Yes to embed copies of linked documents within the PDF report. |
If you select No, the linked documents are not embedded in the report and no paperclip icons display next to spreadsheet records.
| 6. | In the Documents to Embed in Report dialog box, review the list of documents linked to the current spreadsheet's records. |

Documents are sorted by file name.
| 7. | Clear the check box next to any document or file you want to remove from the list. |
A message displays if the total file size exceeds 5 MB, allowing you the option to remove some files before printing.
| 9. | In the message box asking to view the file now, click Yes. |
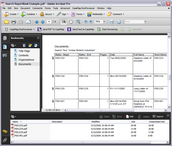
| 10. | When the report opens in Adobe Acrobat or Reader, navigate to a report page that contains spreadsheet records. |
When a ReportBook is printed to PDF, the table of contents is hyperlinked to the relevant content section of the report.
| 11. | Click on the paperclip icon next to a spreadsheet record to open the linked document. |
| 12. | In the message box asking if you would like to open the file or web site, click OK or Allow. |
The document or file opens in a new window and in its native source file application.
| 13. | Click the paperclip icon in the lower, left corner of Adobe Acrobat or Reader. |
An Attachments pane displays in the bottom of the window.
| 14. | In the Attachments pane, double-click on the linked document or file you want to view. |
The document opens in a new window in its native application.
|
| 5. | Click Close when you are finished. |
|


