Pictures and/or clip art can be added to the timeline anywhere you want, including fact and text boxes. You must be in Timeline View to add a picture or image to the timeline. The supported image file types include: .jpg, .gif, .bmp., .emf (enhanced metafile), and .wmf (Windows metafile). You can edit picture display and layout properties, and attach linked files to them too.
Pictures added to the timeline outside of a fact or text box, do not contain dates, do not connect to the time scale, and do not move when the time scale repositions itself.

|
Earlier editions of Microsoft Office will still have clip art stored in the program. Newer versions use images cleared through the Creative Commons licensing system and are accessible via the Bing search engine. For more information, contact Microsoft support.
|
When adding a picture, you can choose from the following tabs:
| • | Gallery includes a variety of images from TimeMap's program files. |
| • | Icon includes a selection of font-based icons. |
| • | In Use displays images already used in this timeline. |
| • | File allows you to add an image file saved on your desktop or in a network folder. |
| • | Clipboard displays the last image copied from the Microsoft Clip Organizer. |
| 1. | On the Home ribbon, click Images, and then click Picture. |
You can also right-click on the timeline and click New Picture > Choose Picture.
| 2. | In the Choose Picture dialog box, click on the tab for the type of image you want to add: Gallery, Icon, In Use, File, Clipboard. |

| 3. | Click on the image you want or browse to locate a file, then click OK. |
|
| 1. | Double-click on the fact box you want to edit. |
| 2. | In the Fact Box Properties dialog box, click the Image tab. |

| 3. | Click the Pick Image button. |
| 4. | In the Choose Picture dialog box, click on the tab for the type of image you want to add: Gallery, Icon, In Use, File, Clipboard. |

| 5. | Click on the image you want or browse to locate a file, then click OK. |
| 6. | Preview the selected image in the Image tab. |
| 7. | In the Size and Scale area, click in the Height and Weight lists to increase or reduce the image size. |
| 8. | Select or clear the Lock Aspect Ratio check box. |
| 9. | In the Image area, select or clear the Transparent check box. |
The Transparent check box may be grayed out if it does not apply to the selected image.
| 10. | In the Pad list, click on the arrows to add white space before and after the image and text. |
| 11. | Click the Change Image or Remove Image buttons to edit or delete images. |
| 12. | Click OK to insert the image into the fact box. |
|
The first time you add Microsoft Clip organizer images to your timeline, you have the option to organize folders for your projects. The following procedures include these steps.
If you want to insert clip art anywhere in the timeline, you should resize the image in an image editor before copying it into the timeline.
| 1. | Click on the fact or text box or region of the timeline where you want to add the clip art. |
| 2. | On the Home ribbon, click Images, and then click Clip Art. |
You can also right-click on the timeline and click New Picture > Clip Art.
| 3. | In the Microsoft Clip Organizer dialog box, browse to locate the image you want to add. |

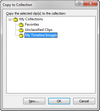
| 1. | Click on the arrow next to the image and click Copy to Collection (Office Collections) or Make Available Offline (Web Collections). |
| 2. | In the Copy to Collection dialog box, click on the folder where you want to save the image, then click OK. |
| 3. | Click the New button to organize images under the My Collections folder. |

| 4. | In the New Collection dialog box, type in the name of the folder and click OK. |
| 5. | Click on the folder or subfolder you want where you want to add the new folder, then click OK. |
|
| 6. | In the Microsoft Clip Organizer dialog box, click on the folder where the image you want is saved or select a new image to use. |
| 7. | Right-click on the image and click Copy. |
| 8. | Click on your timeline and click Paste. |
| 9. | If you want to use the image anywhere in your timeline, you can move it to the region where you want it to display. |
| 10. | Double-click on the box you want to insert the image into and click the Image tab. |
| 11. | Click the Pick Image button. |
| 12. | In the Choose Picture dialog box, click the Clipboard tab. |
| 14. | Click OK to insert the image into the fact or text box. |
| 1. | In the Fact or Text Box Properties dialog box, click the Image tab. |
| 2. | In the Size and Scale area, click the arrows to adjust the Height and Width. |
| 3. | Select or clear the Lock Aspect Ratio check box. |
| 4. | In the Pad list, click on the arrows to add white space before and after the image and text. |
|
|


