Navigating CaseMap
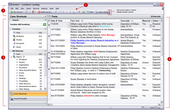
CaseMap's user interface is designed so your spreadsheet data displays in the primary workspace pane for maximum viewing. This workspace pane is where you will enter and track facts, objects, documents, and issues in individual spreadsheets. To move quickly between each spreadsheet, you will use the Navigation pane on the left side of the application. The Navigation pane has two interchangeable panes: Case Shortcuts and Search Results. Each pane is then divided into task panes where tools or shortcuts are organized by groups.
When you are working in a case, use the Case Shortcuts pane to access CaseMap spreadsheets and the Search Results pane to review and narrow search results. You can run full-text searches in either pane.
The tools you need to search, sort, edit, and analyze data as well as create reports are primarily performed by clicking on Standard toolbar buttons or clicking on commands in drop-down menus. All administrative tasks are located on menus.
The Title bar displays the current case name and the Menu bar contains menu items to perform CaseMap tasks.
The Standard Toolbar contains buttons that let you add or delete records, print, adjust fonts, access record details, add questions, perform multi-level sorting of data on spreadsheets, and more. Some buttons only activate with certain spreadsheets.
The Navigation pane runs vertically along the left side of CaseMap and provides access to two different panes: Case Shortcuts and Search Results. Click on the Navigation buttons at the bottom of the pane to access each set of tools.
Displays the various spreadsheets you will work in for your case, including the Facts, Persons, Documents, Issues, Events, Pleadings, Proceedings, Questions, and Research spreadsheets, among others. These spreadsheets are where you will enter, modify, and track your case data. Spreadsheet entries are called objects and are collectively displayed in the All Objects spreadsheet. |

