CaseMap allows you to add and remove toolbar buttons and settings for your personal view.
| 1. | On the Quick Access toolbar, click the More Buttons  icon in the upper left corner. icon in the upper left corner. |
| 2. | Select or deselect the buttons you want to display. |
Menu items with a check mark display on the toolbar.
The toolbar display is updated.

|
To reset to the toolbar to its original display, click Reset Toolbar.
|
|
| 1. | On the Quick Access toolbar, click the More Buttons icon in the upper left corner. |
| 2. | From the menu list, select one of the following: |
| a. | Click Customize the Ribbon. |
| b. | In the Choose commands from area of the Ribbon Customization dialog box, select the desired command/tab. |

The Command display is updated based on the command type selected in the previous step.
| c. | Under the Customize the Ribbon heading, place a check mark next to the tab(s) to be displayed. |
| d. | Use the applicable up  or down or down  arrow to place appropriately. arrow to place appropriately. |
| 1. | Under the Customize the Ribbon heading, select the tab/area where the new tab is to be added. |
| 2. | Click the Add button and then click Add New Tab. |
A new tab is added.
| 3. | Click the Rename button. |
| 4. | In the Display name box, enter a new name for the tab. |
The new name is displayed.
| 6. | Click OK to close the Ribbon Customization dialog box. |
|
| 1. | Click the Reset button and select: |
Reset only selected tab to reset only settings for the selected tab.
Reset all customizations to reset all customized settings back to the default system settings.
|
|
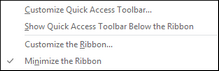
| a. | Click Customize Quick Access Toolbar. |
| b. | In the Quick Access Toolbar Customization dialog box, under the Choose commands from heading, select the command(s) to be displayed and click the right arrow  to move the command under the Customize Quick Access Toolbar heading. to move the command under the Customize Quick Access Toolbar heading. |
You can also click the More Buttons icon on the Quick Access Toolbar and the select a toolbar option for display.
An updated toolbar displays.
|
The Quick Access Toolbar can be displayed above or below the CaseMap ribbon by selecting the 'Show Quick Access Toolbar Below the Ribbon' option when customizing the toolbar.
|
|
|
| 1. | On the Quick Access toolbar, click the More Buttons icon in the upper left corner. |
You can also right-click on a tab (e.g., Home) on the ribbon or right-click on an item on the ribbon to display the menu list.

| 2. | Click Minimize the Ribbon. |
The Ribbon collapses and is no longer displayed.
|
To toggle between display and non-display of the ribbon, you can also click the Ribbon Display Options button  located in the upper right-hand corner of the CaseMap display screen. located in the upper right-hand corner of the CaseMap display screen.
|
|
| 1. | On the Quick Access toolbar, click the More Buttons icon in the upper left corner. |
| 2. | Click Minimize the Ribbon. |
The Ribbon is displayed.
|
To toggle between display and non-display of the ribbon, you can also click the Ribbon Display Options button located in the upper right-hand corner of the CaseMap display screen.
|
|

