Sending facts to CaseMap
We encourage you to use CaseMap from the first day you begin working on a new matter. When you use CaseMap in conjunction with TextMap, you can enter new facts well in advance of having court-appropriate sources for these fact records. And you can always update the existing fact records while working in TextMap. Later, when you find a source for a given fact as you review a transcript, you can update the pre-existing fact.
TextMap is designed so you can optionally perform all basic data entry about a fact in the midst of sending a transcript passage to CaseMap. These options are available in the dialog boxes that display when you send a new fact to CaseMap or update an existing one. For each transcript passage sent to CaseMap, TextMap automatically creates a source that references the transcript and the page and line numbers of the selection. You must have the related CaseMap case already open in order to send transcript annotations from TextMap to CaseMap.
You can tell which annotations have already been sent to CaseMap by checking the Annotations pane at the top of the page. The Linked Fact column has a Yes/No status indicator for each annotation. Annotations with a Yes have been sent to CaseMap. The CaseMap fact automatically links back to the selected passage in the transcript. If the fact has already been sent a message displays asking if you want to re-send the annotation (it replaces the link to the existing fact).
If you intend to send multiple annotations to CaseMap, consider switching to the Auto Send to CaseMap annotation mode. Click the arrow next to the Annotate in TextMap button or click the Annotations menu, and then click Auto Send to CaseMap. Each time you annotate transcript text the Send to CaseMap dialog box automatically launches, skipping the New Annotation dialog box.
|
If your organization uses CaseMap, follow those established guidelines for creating short names in CaseMap. If you do not understand the concept of short names, please refer to the CaseMap Answer Center. |
|
Once you have sent annotations to CaseMap, you can use options on the Annotations menu to instantly jump to a selected annotation's associated fact in CaseMap or display a Fact Detail window with information about the associated fact. Right-clicking an annotation in the Annotations pane opens a shortcut menu with the same CaseMap-related options. |
|
Some organizations install program files on servers, along with the case files. If your organization installs CaseMap and TextMap on a server, these programs must be installed on the same server in order for the links to hold. Additionally, if you move a TextMap case file that contains links to a CaseMap case, you could break the link to the CaseMap record. See Moving cases and Managing/changing file locations topic to plan the case file move beforehand. |
You can also right-click on the selected text and click Send To, and then click CaseMap - New Fact. The Send to CaseMap - New Fact dialog box displays.
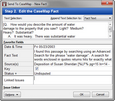
Notice that the transcript content displays in the Text Selection box. Do not delete these brackets as they help link it to the source file. Fact Text is also selected in the Append Text Selection to list and the deposition is listed in the Source(s) field. Any annotation notes display in the Fact Text field. If you have already sent an annotation from this transcript to CaseMap, the Step 1. Link this Proceeding to CaseMap dialog box does not display.
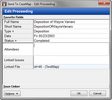
Click the Save & Edit button to open the Edit Proceeding dialog box and enter additional information about the new object record, such as the type and status of the document, and any attendees present.
Notice that the transcript content displays in the Text Selection box. Do not delete these brackets as they help link it to the source file. Also notice that the Append Text Select to box automatically lists the Fact Text field. You can select other columns on the spreadsheet to receive the text or click "Do Not Append" if you're entering a summary of the fact and simply want to refer back to the actual text when necessary. Annotation notes display in the Fact Text box and will display in the Fact Text field in the Facts spreadsheet directly under the annotated text in brackets. You can turn this option off from the Tools menu by clicking Options and then clicking the Annotation tab. Next clear the Use Annotation Note for new Fact Text check box. The deposition is listed in the Source(s) field.
In TextMap, the transcript opens to the page/line number of the annotation.
|
You can remove annotation links to fact records in CaseMap. Annotations in the transcript will remain. Deleting the links in TextMap does not delete the fact records in the CaseMap case.
|


