A companion product of CaseMap, NoteMap® is an outlining tool that offers many features that allow you to produce outlines in ways a traditional word processing program does not. You can send data from any CaseMap spreadsheet directly to a NoteMap outline and import a NoteMap outline into the Issues spreadsheet of CaseMap.
To learn more about NoteMap®, download a free 30-day trial version at www.lexisnexis.com or contact your LexisNexis CaseMap account representative at 866-316-8525.
| 1. | In the Case Shortcuts pane, click the icon for the spreadsheet you want to use. |
| 2. | On the Reports menu, click Send Current View To and then click LexisNexis NoteMap. |
| 3. | In the Send to NoteMap Options dialog box, select the check boxes for each field you want to include as a parent note in the NoteMap outline, then click OK. |

Each record in the spreadsheet becomes a parent note in NoteMap.
| 4. | In the next dialog box, click the Move Up and Move Down buttons to organize the parent note field order, then click OK. |

| 5. | In the next dialog box, select the check box for each field you want to include as a child note in the NoteMap outline, then click OK. |
| 6. | In the next dialog box, click the Move Up and Move Down buttons to organize the child note field order, then click OK. |
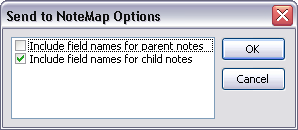
| 7. | In the next dialog box, select the check boxes on whether to include the field names for parent and child notes, then click OK. |
| 8. | In the message box indicating the number of records being exported, click OK. |
| 9. | In the message box indicating the all data has been copied to a clipboard, click OK. |
| 10. | In NoteMap, click the New button on the File menu to open a blank outline. |
| 11. | Click the Paste button on the Standard toolbar to paste your spreadsheet data into the outline. |
Notice that all parent and child notes now display as you selected them.
| 12. | On the File menu, click Save to name and save your new outline. |
|


