You can create a clip from an audio file, video file, or from a video deposition. Once a clip is created, it is ready to be added to a playlist or it can be added to a presentation directly.
To create a clip, you use the media player and the clip creator. You can access these tools in the Media area when a media item or clip is selected, or in the Transcripts area when a synchronized deposition is selected.
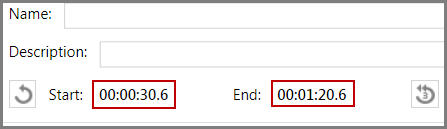
A key task in creating a clip is setting the start and end time. Your options for setting start-and end times depend on the type of item you are working with.
| • | When creating clips from media or synchronized transcripts, you set the start and end time using the media player in conjunction with the clip creator. Using the media player, you move to the start time and then set the clip start time using the clip creator. Then repeat the process for the end time. This process also works when editing a clip you have already created. |
| • | When creating clips from synchronized transcripts, in addition to using the media player and clip creator, you can set the clip start and end times by selecting a range of transcript text. Or if you already know the starting and ending page and line numbers that you want to create a clip from, you can enter these values directly into the clip creator. This method is called a Quick Clip. For more information on creating clips from Synchronized transcripts, see: Synchronized Transcripts. |
Whatever the method you use to specify the start and stop time of a clip, you can adjust the timing of it by replaying it in the media player and then reset start and stop time again before saving it.
| 1. | Select the HOME tab and then click the Media navigation bar. |
| 2. | Select an audio or video file from the media list. |
The media player opens in the preview window.
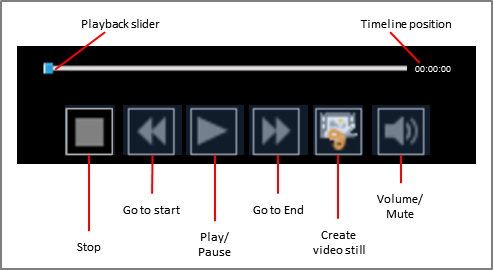
| 3. | Use the play button and the slider on the media player to move to where you want your clip to start. |
| 5. | Use the play button and the slider on the media player to move to where you want your clip to end. |
| 7. | Precisely edit the start and stop times as necessary. For more information, see the next procedure in this topic. |
| 8. | Type a name for your clip and a description, then click Save. |
The clip is now listed in the media clip list.
|
As you create a new clip or edit an existing clip, can precisely adjust the start or end of the clip.
The method of accomplishing this is to begin playing the clip at a position slightly ahead of the desired start time or end time. Then, as playback proceeds, you click the Set Clip Start or Set Clip End at the exact position where you want the clip to start or end.
To precisely cue the player, use the following options in the Clip Creator, individually or in combination:
|
| 1. | On the HOME tab, click the Media navigation bar. |
| 2. | Select the media item that has the clip you want to preview. |
| 3. | In the clip list, click the clip you want preview. |
| 4. | In the media player, click the play button. |
|
| 1. | On the HOME tab, click the Media navigation bar. |
| 2. | Select the media item that has the clip you want to rename or edit. |
| 3. | In the clip list, do one of the following: |
|
| 1. | On the HOME tab, click the Media navigation bar. |
| 2. | Select the media item that has the clip you want to add to a presentation or playlist. |
| 3. | In the clip list, select the clips you want to add to a presentation or playlist. |
| 4. | Select from among the following options: |
|